The shadow puppets were made out of thick card which was jointed with split pins. This is Henry the Horse made by myself which was approx A4 size.

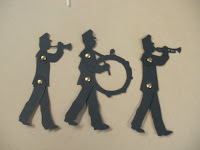
The main figures were made to approx A5 size. The band shown was made by Rhyan Eldon-Davis. We later added coloured gels to the cut out sections such as the drum.
The main characters such as Mr Kite, Mr and Mrs Henderson all had puppets for the front and the side as this would enable us to create more movement, such as spins and flips, with them. Pictured is Mrs Henderson made by myself (you can clearly see the coloured gel used in her costume).

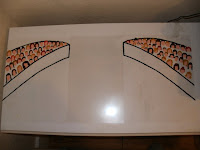
To add interest we painted a crowd scene (Rhyan Eldon-Davis) onto acetate as a background for our action and coloured balloons (Lauren Potter) created more depth of movement. Although remembering to move them proved tricky!!! (If you watch the movie closely the balloons stop moving in the very complicated horse waltz scene.)
Once the puppets were made we started shooting the scenes for the stop animation.
For stop animation you need:
- A tripod with an arm that can extend horizontally - as a counterweight we hung a bag from the back.
- A camera set to auto - check that it has an empty memory card and plenty of power in the battery, we had to stop shooting for both of these and it is very frustrating! If you can get hold of a remote shutter cable this is fantastic, we didn't have access to one and managed anyway.
- A light box that provides backlight (only necessary for shadow puppets) The test run pieces were done on a table which was wonderful for my back but not so great for the images as the movement of the table shifted the camera angle mid scene. The main movie was shot with the light box on the floor - tip mark the edges of the box and tripod feet on the floor with masking tape or whiteboard markers incase you move either while shooting, this will save you about 20mins of faffing around trying to reposition through the viewfinder on the camera.
As a rough guide for each second of movie you make you will need anything from 15 - 25 frames per second. It is a good idea to create individual scenes with the puppets going off screen at the end of each, when you edit this means you can elongate your shots by splicing and pasting with a clear end.
Position your puppets and take a shot, move them fractionally in the direction of travel (remembering which way limbs normally move!) take another shot, move them again etc etc. We really enjoyed the rather pythonesque qualities you can achieve with the puppets leaping into flight, its your movie you can make it as mad or maticulous as you wish.
Once you have finished upload the pictures from the camera to a computer using the usb cable. If you remove the card to do this the chances are you will corrupt the information. Save them as jpeg images in number sequence.
I used a mac to turn the jpegs into a movie. I am not going to do a whole tutorial on computer skills there is not the room on this blog for the reams of notes I have taken while the ever patient Kevin tries to ensure the information stays in my head!
Suffice to say I downloaded mpeg streamclip mac (the one with the red arrow) which is free, to download the music track. Initially for the images I used Quick time 7 and loaded the jpegs onto this as a sequence, this creates a basic movie which I exported to the desktop without doing anything else to it.
I then imported this into imovie as well as the audio track and worked on them there, adding sound effects and credits before finally exporting the finished article to my documents.


question did you cut the horse out from scratch? or is it an image file? I am looking for a horse cut out. would you be willing to share where you got the cut out file, if it is still available? thanks so much!
ReplyDelete