Labels

Showing posts with label Performing Object. Show all posts

Sunday, 13 March 2011

Green screening the Ring Master

Early practices at animating our master puppet were very successful but posed the problem of how would our shadow puppet projection be seen?


After much deliberation and consultation we decided to give green screening a try.  This would enable us to place our puppet directly into the footage we had already made and avoid any continuity problems with the song jumping as we edited our action.


We stretched green felt over a wooden frame and stapled this into place.  The frame needs to be wider than the puppet and also taller than his hat! We had to add green card to the top of the frame to ensure his hat would not pop out of shot.


Once this was done we created a booth at a height that was comfortable for us to operate the puppet.  Extensive use of gaffer tape ensured the frame remained rigid, held by bamboo struts against the wooden sides.

We cut three holes into the felt, one for the back and one for each arm.  The video camera was set up on a tripod infront of the booth ensuring the whole of the booth was visible.


   Our curtain made by Lauren Potter was suspended on wire between the wooden struts and she threaded string through rings to enable them to open and close.

The curtains looked fantastic however when it came to editing the movie they proved too difficult to mask into the final production.


We made several mistakes in this first shoot so a complete reshoot was required the next day.  The booth was not lit sufficiently which meant that Final Cut Pro (the program we used for editing) could not differentiate between the darker green created by shadows and the black of the puppets trousers. Most hand action went beyond the screen which meant his hands dissappeared!!!

Once we had the replacement footage we reduced it to only the action we might use with imovie and then imported this into Final Cut Pro. 

Thats the way to do it!!!!!!!

Image from accesslanguages.co.uk

I thought that I would include a potted history of Punch and Judy puppet theatre as my early experiences of puppetry were sitting on a beach watching Punch and Judy or Andy Pandy on the television.  Making my puppet has evoked fond memories of childhood and at the time there seemed nothing wrong with Punch beating his wife, it seemed fitting and a bit naughty and he always got his comeuppance!

George Speaight describes this fascination in his book 'Punch and Judy A history'
"The puppet theatre has not always been a childrens theatre, but it has always been the theatre of the people.  The wealthy and the sophisticated too have loved the puppets, but as a light diversion or a passing fancy; their elemental appeal has always found an enduring response from the simple and the pure in heart, from peasants and labourers, from artists to poets, from the child-like spirit in man."  

The show has its roots as far back as 500BC with Greek and Roman puppet shows, continuing into minstrel puppet shows based on European folk traditions until the 1500's.  As far back as the Roman Atellan Farce plays there have been defined characters that everyone could recognise.  Bucco, the comic slave; Maccus, the country bumpkin; Pappus, the old dotard; Dossennus, the sharp tongued hunchback; Manducus, grinding his teeth to frighten the children; Cicirrus, the 'cock man' a boastful fighter.

In England puppet shows were based around a the religious theme of Church Mystery plays however buffoonery very soon crept into these plays, the shepherds were shown as country bumpkins, Noah's wife as a shrew and Herod raging as in a melodrama. The ecclesiastical authorities, finding themselves unable to curb it, finally expelled the entire drama from the churches. 

Will Kemp - Elizabethan Clown

1550 - 1650 in England saw the rise of the clown in Elizabethan theatre, these were not scripted parts but were there to amuse the lower classes.  The character loved food and drink but hated hard work; sometimes dishonest, fond of practical jokes, a coward and a braggart, speaking either crudely or absurdly extravagantly; when married he had a shrewish wife; he was an acrobat and a mime and would often sing between the acts and dance a jig to end the program.  Pictured is Willaim Kemp an Elizabethan clown who gained fame by composing jigs and dancing a morris all the way from London to Norwich!

Image from speckinspace.com
The character of Punch was introduced into England in 1700 and came from the Italian Commedia dell' Arte puppet shows where Pulcinella and Polichinelle were heros of the puppet stage.  Initially known as Punchinello by 1800 his name had been shortened to Punch and he had become synonymous with the character of the clown.


 Although Punch's name has remained consistant his wife has changed her name from Joan in the 18th C to Judy in the 19th C.  An excerpt from The Authors Farce by Fielding has Punch singing "Joan you are the plague of my life, A rope would be welcomer than such a wife!".  Theories for this include a corruption through the use of swazzles (a contraption to make the voice squeaky) in Punch's voice of the name Joaney. However Joan was the most popular name for girls in the lower classes in the 16 -17thC and used as a synonym for a domestic and a 'Judy' in the 19thC was slang for a tramps woman which may have more bearing on why the name was changed.

The shows have not always been performed by glove puppets, early versions were marionettes in the Italian tradition with 'trailer' booth shows outside advertising their wares.  However marionette shows were expensive to run and difficult to transport and dwindling takings encouraged puppeteers to downsize and take their shows onto the streets.  This shift to a one man band also affected the characters, the cast varied from seven to seventeen characters depending on the wealth and skill of the puppeteer who was limited by the confines of the booth to a two handed operation.  Thus some of the characters that were familiar to an 18thC audience are lost to us today.


Image from theguardian.co.uk

     
The characters in a show are not fixed but vary like a soap opera does.  New characters may be added as the tradition evolves, and older ones dropped.  The gradual decline in popularity of Punch and Judy shows is discussed in an article Pack your bags Punch and Judy  by Hermione Buckland-Hoby (Tuesday 29 April 2008) in the Guardian and it seems that is it definately time that the old tradition is once again given new legs.

Cast of characters:
Main characters include:
Mr Punch
Judy
The Baby
The Constable
Joey the Clown
The Crocodile
The Ghost
The Doctor 

Characters once regular but now occasional:
Toby the Dog
Hector the Horse
Pretty Polly
The Hangman
The Devil

Characters only seen in historical reinactments:
The Beadle
Mr Scaramouche
The Servant
The Blind Man

Speaght, George : Punch and Judy A history (1970) Studio Vista Ltd, London

Thursday, 10 March 2011

He has got nothing to wear!!! Making the costume for the ringmaster puppet.

The master puppet was a joint effort between Rhyan and myself.  The group had decided that the puppet would be approx 1m tall and be operated by two people.  Initially we tended towards a rod animated puppet but as the ring master began to take shape it became clear we could gain more expression from a gloved arm puppet. 

We each made a potential head for the puppet in a different style to see which would be the most successful.
 
 This was my head made of tights stuffed with wadding and sewn to form features.  The moustache and eyebrows were wool twisted with beading wire to hold them in a rigid shape.  Although this was effective it didn't have the presence that we had imagined.


The head that Rhyan made had much more three dimensionality to it and in my opinion was a little more creepy which was perfect.  We decided to add false eyelashes and a moustache made in the
same way as my original head.


The final head.


The hat was made from black felt stuffed with wadding.  Half an hour of fiddling with paper templates produced a useable shape.


I incorporated wire into the rim before sewing it onto the main body of the hat, this made a wonderful mad hatter shape when finished.


Initially we used velcro to stick the hat onto his head but this was not successful as it kept moving.  It was finally secured using superglue. 


Rhyan then made the body out of plywood cut into a frame and jointed plastic tubes for the legs.  There was no need for arms as these would be incorporated into the costume.

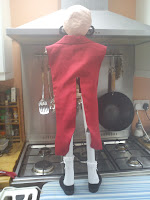
Once the body was finished I took over for the costume.  Firstly there was a shopping trip required!!!  A troll around the second hand stores of Gravesend produced a pair of black trousers, a red jacket and childrens shoes - customising the outfit would be much quicker than making one from scratch!  (An excellent tip I have since recieved is to shop for childrens wedding outfits in the sales as these look like miniature adult costumes.)


I stuffed a pair of childrens socks with wadding and glued them into the shoes with super glue (incase anyone is interested these were size 4 shoes) then attached them to the puppet legs with more glue.

This gave them enough movement on the ankle to flex with the puppet legs and also weighted the legs to move in a more realistic manner.


The jacket was a perfect colour but much too large at a size 14 so I cut it down to size and re-seamed the edges, creating two tails in the extra length at the back. 


I elongated the gap between the tails so hand operating the body from the back would not disturb the costume.

 
The arms were more tricky as they would need to have a stuffed upper arm but a lower sleeve big enough for a puppeteer to put their arm through.

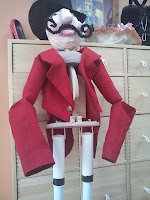
I created a tube closed at one end for the upper arm and stuffed this with wadding, seaming the open top into the arm hole, attached to this at the elbow was the bottom of the original cut down sleeve. 


The finished jacket.


The trousers were very easy to create, I cut off a leg from the originals and seamed up and down the centre, reinforcing the crutch with overstitching several times. 

I then cut up the middle of my two seams and turned the trousers right side out.  The waistband was created by turning down the fabric twice rightside and overstitching top and bottom, finishing off with a button glued on centre front.  Any excess was adjusted by tucks at the back as this would not be seen.


Padding out the plywood frame was necessary to fill the costume and give something to stitch it firmly into place.  All the padding was created with tights stuffed with wadding and then fixed into place.

The shoulders were stitched into place around the plywood frame.


The front was nailed into the hip cradle and sewn onto the shoulders before stuffing and hand seaming closed.


All the clothes were then stitched into place.  A false shirt front and a cummerbund made of black ribbon completed the look.


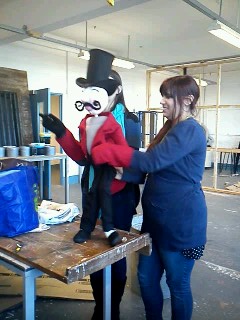
Early rehersals for the movements!

FINAL PUPPET FILM!!!!!!!!


Our final film, to the Beatles 'Being for the Benefit of Mr Kite'. There are a few moments when it jumps, this is due to a couple of frames being dropped while we were using Final Cut Pro. We are unsure why this is and unfortunately were unable to fix it.
We hope you enjoy it!

Monday, 7 March 2011

Stop Motion Animation

The majority of our final movie is created with stop motion animated shadow puppets.  This is a very effective way to animate and although a lengthy process it is relatively simple.

The shadow puppets were made out of thick card which was jointed with split pins.  This is Henry the Horse made by myself which was approx A4 size.


The main figures were made to approx A5 size.  The band shown was made by Rhyan Eldon-Davis.  We later added coloured gels to the cut out sections such as the drum.

The main characters such as Mr Kite, Mr and Mrs Henderson all had puppets for the front and the side as this would enable us to create more movement, such as spins and flips, with them.  Pictured is Mrs Henderson made by myself (you can clearly see the coloured gel used in her costume).


To add interest we painted a crowd scene (Rhyan Eldon-Davis) onto acetate as a background for our action and coloured balloons (Lauren Potter) created more depth of movement.  Although remembering to move them proved tricky!!!  (If you watch the movie closely the balloons stop moving in the very complicated horse waltz scene.) 

Once the puppets were made we started shooting the scenes for the stop animation.   

 For stop animation you need:
  • A tripod with an arm that can extend horizontally - as a counterweight we hung a bag from the back.
  • A camera set to auto - check that it has an empty memory card and plenty of power in the battery, we had to stop shooting for both of these and it is very frustrating!  If you can get hold of a remote shutter cable this is fantastic, we didn't have access to one and managed anyway.
  • A light box that provides backlight (only necessary for shadow puppets) The test run pieces were done on a table which was wonderful for my back but not so great for the images as the movement of the table shifted the camera angle mid scene.  The main movie was shot with the light box on the floor - tip mark the edges of the box and tripod feet on the floor with masking tape or whiteboard markers incase you move either while shooting, this will save you about 20mins of faffing around trying to reposition through the viewfinder on the camera. 
The camera was put into position above the light box and a couple of test shots taken to ensure the positioning was correct.  Then we began the long process of making the scenes.

As a rough guide for each second of movie you make you will need anything from 15 - 25 frames per second.  It is a good idea to create individual scenes with the puppets going off screen at the end of each, when you edit this means you can elongate your shots by splicing and pasting with a clear end.

Position your puppets and take a shot, move them fractionally in the direction of travel (remembering which way limbs normally move!) take another shot, move them again etc etc.  We really enjoyed the rather pythonesque qualities you can achieve with the puppets leaping into flight, its your movie you can make it as mad or maticulous as you wish.

Once you have finished upload the pictures from the camera to a computer using the usb cable.  If you remove the card to do this the chances are you will corrupt the information.  Save them as jpeg images in number sequence.

I used a mac to turn the jpegs into a movie.  I am not going to do a whole tutorial on computer skills there is not the room on this blog for the reams of notes I have taken while the ever patient Kevin tries to ensure the information stays in my head!

Suffice to say I downloaded mpeg streamclip mac (the one with the red arrow) which is free, to download the music track.  Initially for the images I used Quick time 7 and loaded the jpegs onto this as a sequence, this creates a basic movie which I exported to the desktop without doing anything else to it. 
I then imported this into imovie as well as the audio track and worked on them there, adding sound effects and credits before finally exporting the finished article to my documents.  

The whole movie after a long long day of shooting in the dark!


The first video shows the movie without sound effects and the second one has been played with a little more.  We wanted to have two versions as we are unsure how effective the sounds will be when we project them onto the screen behind our main puppet.  This gives us an option of adding them back in at a later date when we do our final edit.


A link to a horse show currently running in the USA showing a mixture of gymnastics and horse very similar to henry the horse and the Henderson's dance routine http://www.youtube.com/watch?v=np8WJ_2TbLA

Monday, 28 February 2011

Henry the Horse (the alternative).

After making Judy the Punk I wondered what Henry the Horse would look like as a Punch and Judy style puppet.  I decided to make the head out of styrofoam as I wanted to compare the detail achievable with polystyrene when carving.

Working in the same way as for the polystyrene head I drew the outline of the horse onto the block and roughly hatched out the shape using a bread knife. 


I then drew on the facial contours and hatched them out in the same way.

Ears will be adding onto the block once the face is carved.


The finer details of the nose, mouth and eyes were created using a smaller snap blade craft knife.


The ears were carved to shape before sticking into place with pritt stick and covering with a further layer of brown gummed paper.  This was not an ideal solution (Bostic two part adhesive is the best glue) but I had limited resources at home and this provided a firm join.


  Once both ears were in place I sanded the head with fine wet and dry all over.  The hole to allow hand operation was carved out from the back of the head and a groove for the thumb created between the cheeks.

The entire head was primed with two coats of white paint before painting.  Be careful what paints you use on styrofoam, I used water based acrylic which will not cause it to melt, if you want to use other paints then cover the sculpture in several layers of papier mache before painting.


This picture clearly shows how the head will be operated.


The head after painting and the addition of a mane.  This was the left over sheepskin from the Judy puppet.


I made a sleeve for the neck out of an old white cotton bed sheet and painted it to match the head.  The long side was machine stitched together and the mane pinned into place and handstitched down.

Glue the neck to the back of the head (I secured it into place with dressmakers pins while the glue set) and finally brush the hair into place with your fingers. 

The final article!! Perfect for a chat over the fence.


Friday, 25 February 2011

The miracle of imovie!!!!

After several hours of patient tuition this morning I was able to create this second draft of the shadow puppet movie complete with a sound track and special effects!!!!  Hooray for the magic that is imovie.


I now have a large headache but an even larger sense of satisfaction!!!

Wednesday, 23 February 2011

looking at the link you posted i found anoher which i really liked it shows how to make a hand puppet/glove puppet it looks very simple !
http://www.ehow.com/video_5238578_make-girl-puppet.html

Friday, 18 February 2011

First pictures of the shadow puppets

I have put a few pictures of the shadow puppet action stills that were shot as a demonstration to see how successful we could make this.  Please excuse the slow running of the pictures I am working with an old laptop and movie maker and can lay no claim to being an expert.  (That's Rhyan and Lauren's job!!)


Even though these are rough I am pleased with the way the puppets moved and excited by the colour gel used in Mrs Henderson.  The trapeze was created using a piece of wool and the flow makes the action more believable.  We are working together to create more background for the circus scenes and then the puppets can perform in a more exciting environment.

A Gloved Arm Puppet


Expert Village do a series of puppet tutorials, this one was great as inspiration for our main puppets hands.

Ring leader puppet head


Hi I was wondering if you could give me any improvements or critisism for the puppet head, I feel it needs something but am unsure about what that is...?

Mixing Puppets with Hands.


This act is not only hilarious but cleverly uses a mixture of the puppetry and real. It might be wonderful to use an element of this in the main puppet.

Friday, 11 February 2011

Punch and Judy


The Punch and Judy style head is created using a base of carved polystyrene.  First draw the profile of the head.  If the puppet is to have an enourmous nose and chin only draw to the base of these and add more polystyrene to create the length.  Carve the rough outine out.


 Draw the guidelines for the facial features on the front, narrower side of the block.  Roughly carve the shape creating the contours of the face. 


 Rough shape completed I am ready to stick on the additional pieces for the nose and chin.  When sticking polystyrene together you have to be very careful which glue to use, I used Bostic general purpose adhesive which is a contact adhesive.  Smear a thin coat onto one side and rub the two pieces together to transfer the glue, allow to air dry for a minute before pressing together.
  

The glue forms a strong bond but if additional strength is required you can use dowelling rods in the centre of the join.


Nose and chin are carved and I have decided to use the same method for ears.  Initially I stuck the ears on as blocks however I soon had to remove them to carve them properly and restuck them on afterwards.
 
All the carving is now done and the head needs further strengthening by coating it with papier mache.  As the polystyrene will remain in the core I am only applying two layers, one of newspaper and one of thicker brown paper.  An extremely lightweight head can be created by removing the core once several layers of papier mache have been applied (minimum of four) allowing mechanisms for movement to be placed inside. 

The papier mache was agonisingly slow to complete each layer taking two hours, this was mainly due to the protruding contours of the face .


The brown paper layer was marginally quicker as the PVA and water mixture had not completely dried from the first.  However a quicker method might have been to use pregummed brown tape (shown in the bottom right of the photo) which I used  to seal any gaps on the head once it had dried .


 Once the head was completely dry ( I left it overnight ) the paint can be applied.  All the paints I have used are water based acrylics.  First a base coat of white was put over the entire head and then I slowly built up shadowed and highlighted areas.
 
 
 Once the shading is complete her eyes and mouth are drawn then painted on.


Adding white highlights to the eye makes it come to life. 


 It was at this point while mulling on who my Judy would be that a character suggested itself to me based on her name.  Judy is a Punk....by The Ramones. 


She immediately had to have safety pins through her nose and ear!!!!!!  The search for the perfect hair began.

This was a strip of purple fake fur.........a good colour but not feminine enough.


This was a remnant of sheep's hide an absolutely perfect hair effect but not Punk enough
 
 I created this mohican out of blue felting wool which looked excellent but a bit stark, more Punch than Judy.  I decided to go for the best of both and wrap a strip of hide around the mohican to give a two tone effect.


 Attaching the hair to the scalp without a glue gun proved very awkward.  The blue centre section was attached with a strip of double sided sticky tape, I then sewed the hide through this and secured the edged of that with a combination of more tape and a few strategically placed dressmakers pins.
 The finished head.........................................Judy is a Punk!!!!